Reproduced by Kind Permission Of Mike Horrill Aldebaran

Sword Making Guide.
Making the Blade.
Making the Blank.
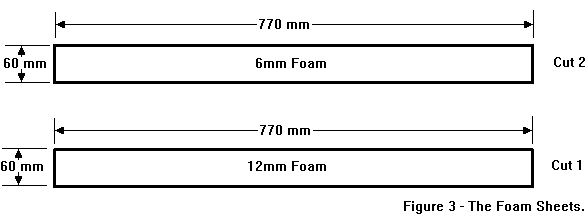
The first stage is to make the blank for the blade. Cut 2 pieces of foam
60mm X 770mm from the 6mm sheet and one piece 60mm X 770mm from the 12mm
sheet (Fig. 3).

Take the piece of 12mm thick foam and cut out a strip 12mm wide from the
centre of this leaving 35mm at the end (Fig. 4).

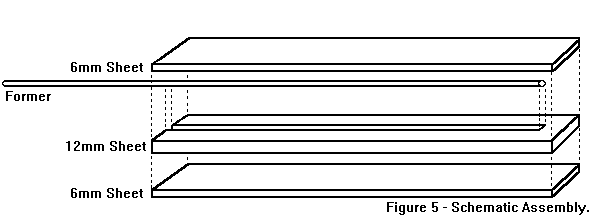
It is now time to construct the blade blank. Take the 3 pieces of foam
and the former. They will eventually be assembled as shown below (Fig.
5).

Tip Reinfoecement.
This stage is often neglected by people making thier first weapons but
it is probably the most important part of making a sword.
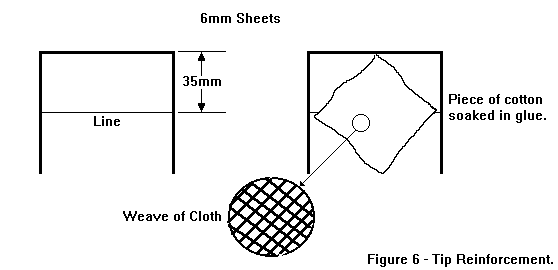
Take a material such as cotton ond cut 2 small squares approximately
35mm X 35mm. Soak them in glue and leave them to dry.
On the two 6mm sheets mark a line across them 35 mm from the end as
shown. Take the 2 pieces of cotton and glue them on to the two 6mm sheets
as shown making sure that you use plenty of glue. Note how the thread of
the fabric is positioned so that it lies at 45 degrees to the former and
not running across the end (Fig 6). This helps prevent the fabric for tearing
across the end of the former.

Glue one of the 6mm sheets to the 12mm central sheet with the cloth between
the two. Now glue the former into the central channel. Be careful to make
sure that you spread glue along all the walls of the central chanel as
well as on the former. If you have a hot melt glue gun position the former
so that there is a 2-3mm gap at the end, otherwise ensure that the former
is forced all the way up to the end of the channel).
Take the hot melt glue gun and fill in the small gap at the end of the
former with hot melt glue. This helps to make a slightly flexible section
on the tip of the former which helps extend the life expectancy of the
weapon.
Now that you have done this gule the other 6mm sheet on to this with
the cotton inwards again. You should now have something which looks like
a foam cricket bat (Fig.8). Leave this overnight for the glue to dry fully.

Shaping the Blade.
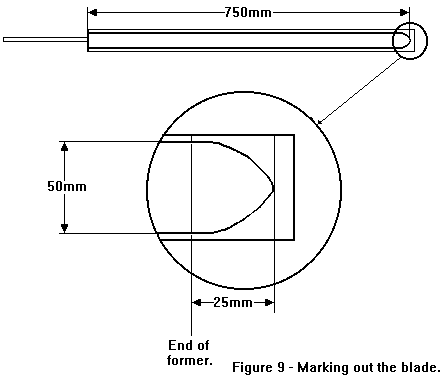
Now mark out the shape of the blade. The final blade will be 50mm wide
so mark 2 lines down the 50mm apart and an equal distance from either side.
Locate the tip of the former either by feel or by holding the blade up
to a strong light. Mark this point on the balde and another line 25mm from
it. Mark the tip on the blade being careful not to start tapering the tip
until the end of the former. In order to get the tip symetrical it is a
good idea to cut a small card template that is the shape of half the tip
and use this to mark out the tip on the foam (Fig 9).

Now take a sharp knife and carefully cut out the the blade. You should
now have something which looks like a sword blade when viewed from the
top (Fig. 10).

Return to Sword Making Guide Index.
Back to Cutting and Weighting the Former.
Forward to Cutting the Edge.


